
Siding Installation – How to Properly Prepare Your Home For Installation
The best time to install new siding is spring and fall, when temperatures are moderate. Scheduling your siding replacement during a contractor’s off-season can also result in better pricing and faster installation.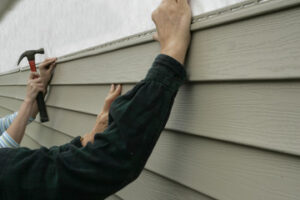
Clear a path for the siding crew and remove outdoor furniture, potted plants and children’s toys from the yard. Also, trim your grass short before the day of your installation – this will make it easier for the team to find any stray nails in your yard afterward. Contact Siding Installation Long Island for professional help.
Siding installation costs can vary depending on the material you choose and the size of your home or commercial space. However, a good rule of thumb is to estimate $10 per square foot. This includes the cost of materials and labor. It’s also important to consider the cost of additional materials, such as housewrap or rigid insulation. These may increase the total project cost, but they can improve energy efficiency and make your home more comfortable.
Before the crew arrives for the actual siding replacement, you can prepare your property by clearing out the driveway and creating room to work. You’ll also want to remove or relocate any items that could fall during the demolition and installation process, including potted plants, shelves, and furniture. A dumpster will be delivered to collect the old siding and debris, so you’ll need to clear a wide area for it. You should also trim any shrubbery and trees around your home, as they could be damaged by scaffolding or errant nails.
The next step is to prep the area where the new siding will be installed, which often includes powerwashing and caulking. Once this is done, the installers can begin installing the panels. They will nail them into the OSB using hot-dipped galvanized coil or 16 gauge finish nails. These nails are resistant to rust and provide a strong bond with the sheathing.
After the panel installation is complete, a specialized team will perform the caulking and painting. This team will use Sherwin Williams Duration topcoat, which is designed to last for 50 years. It’s a high-quality product that’s formulated to resist moisture and UV rays. This step will take a couple days, so you should plan accordingly.
While you can install your own siding, hiring a professional will help ensure that the job is completed correctly. In addition, a qualified contractor will know how much siding you need and have the correct tools and materials on hand. They can also help you select the best materials for your unique climate and environmental conditions. In the long run, hiring a professional will save you time and money.
Materials
There are several materials that can be used for siding. Each has its own unique advantages. While most people choose wood, others prefer aluminum or vinyl. Before choosing a material, it is important to consider your home’s style and budget. It is also a good idea to consult with a professional before beginning the project. A professional can help you navigate local building codes, permit requirements and warranty terms.
The first step in installing siding is to remove the existing trim around windows and doors. Next, sheath the first few feet of each wall with insulation. Once the sheath is installed, you can begin preparing to install the siding. First, measure the width and height of each wall. Multiply these numbers to determine the square footage of the walls. Then, subtract the square footage of any windows and doors from this number to determine the amount of siding you will need.
Before starting to install your siding, make sure you have all of the necessary tools. These include:
A circular saw with a blade that is designed for cutting fiber cement, such as the Performax(r) shears from Menards(r). A framing hammer, a pry bar and a utility knife can also be useful.
You will need to buy siding, flashing and building paper for the job. For the starter strip, you should use galvanized stainless steel nails or aluminum roofing nails with a head diameter of 3/8 inch. To prevent the siding from pulling away from the gable, nail the starter strip to the sidewall flush with the gable and sheathe it with insulation.
For the siding, you should use a weather-resistant product, such as LP SmartSide(r) Trim and Siding. This type of siding combines the classic look of real wood with added elements, such as zinc borate, that help it resist moisture, fungal decay and termite damage.
If you want a more rustic look, you can also choose shakes or shingles. These are hand-split, thicker and have a rough dimensional texture. They are often made from cedar or redwood, though they can be produced using synthetic materials.
Installation
The process of installing new siding requires some pre-project prep on the homeowner’s part. There will be a lot of banging and hammering, so it is important to clear any items from the exterior of the house that could get knocked over or damaged. You should also remove any delicate shelves or wall-mounted pictures before the siding project starts. If you want to keep your home safe, you should also move pets and children away from the work area.
Once the siding contractor has consulted with you about your vision for the finished product, they will provide you with a materials list that includes all of the pieces needed to finish the job. You should carefully inspect this list and make any changes you feel necessary to ensure that the job is done right.
To start the installation, your siding professional will begin by powerwashing the entire exterior of your home and then caulking all the seams. This is an important step, as caulking creates a seal that keeps water out of the walls and protects the new siding from moisture damage. The siding professionals will also apply a Sherwin Williams Duration topcoat that helps your siding last for years to come.
After the siding is installed, your contractor will install under-sill trim around each window and door. This is necessary to prevent water infiltration from the bottom of the windows. To do this, the installers will measure from the bottom of the frame and subtract 1/4 inch from that number. Then, they will cut the under-sill trim to the appropriate size and nail it into place.
Next, they will install the starter strip, which is a piece of furring strip that holds out the first row of siding. This will be nailed to the plywood starter strip with 2 inches of overlap on each side. This will allow the installers to make sure that the siding is level before starting on the main wall.
When the installers reach the gable ends, they will use J-channel to hold out the last row of siding. This is an important step, as it prevents the last row of siding from collapsing against the house and potentially causing water infiltration. They will also install utility trim along the eaves and on the top of each gable end to stiffen it.
Maintenance
Siding is a valuable asset to any home or business, protecting the structure from weather and environmental damage. It also helps keep a building comfortable in all seasons, increasing energy efficiency and saving on utility bills. However, over time, siding can wear down, leaving it vulnerable to moisture penetration and pest infestation. If neglected, this can result in costly repair and replacement projects. Therefore, it is important to regularly inspect siding for cracks, chipping paint, and other signs of wear and tear and address them promptly.
If you are residing your home, it’s best to hire a professional for the job, as it is a complex task that requires proper tools and knowledge. A good home improvement company will have experience with a variety of siding materials and know how to properly install them. They can also advise you on the best type of insulation for your home.
Before you begin the project, clear out a space outside your home or building for the crew to work in and make sure there is adequate power to run their equipment. It’s also a good idea to trim trees and shrubbery to give the crew room to work without damaging them. If your house is in an HOA, be sure to get approval before beginning the project. Otherwise, you may be fined for violating the rules.
The first step is to remove the old siding, starting at the bottom of the wall and working your way up. Then, sheathe the first few feet of the wall with insulation. Next, you can install a starter strip and nail it to the sheathing. After that, sheathe the rest of the wall with insulation and a layer of house wrap.
When installing the siding, start by measuring and cutting each piece to the correct length. Then, interlock each panel with the one below it and slide them into the grooves of J-channels and corner posts. Finally, hammer down each piece of siding and check for level and straightness.
It’s also important to keep your siding clean, as mold and mildew can cause problems in the long run. You can use a pressure washer to remove dirt and debris from the exterior of your home, but be sure to test any cleaning solutions on a small area of your siding first to ensure that they don’t damage it.